Category Archives: Software

Where Are Davinci Resolve 17+ Project Files?

TLDR: If you’re on Windows, probably here:
C:\ProgramData\Blackmagic Design\DaVinci Resolve\Support\Resolve Disk Database\Resolve Projects\Users\guest\Projects.

Please note that your system drive may not be ‘C’, and the user may instead be ‘admin’, presumably if running Resolve as an administrative Windows user.

Now, if you’re hoping to get back an old copy since closing auto-saved unwanted changes then you may be out of luck. Unless that drive has file versioning turned on, or you had already enabled Davinci “Project backups” from “Preferences” -> “User” -> “Project Save and Load”, or you had exported the project earlier.

Still, with this knowledge you can prevent data loss in the future by enabling Davinci “Project backups”, enabling file versioning of your drive in the OS, and/or moving the containing folder to a cloud-synced-folder-with-versions like DropBox; then sym-link the moved folder back to the original location.

Another fun fact, the .db files found therein are SQLite databases, which allows you to peek inside with a variety of different tools.

Browser Routr, Now With Prompter

Ever wish you could more easily dedicate a web browser to only certain sites and still work from your primary browser the rest of the time? I certainly have, yet all the tools I had found for doing so required either manual copy-pasting once inside the browser of choice, or right-clicking to bring up a prompter app. Browser Routr was made to allow automatically routing navigation within a browser to another, based on the website.

For example, one can click a link to Google Sheets from Firefox and have it open in Chrome without any more clicks or keyboard shortcuts. And while Browser Routr is still in beta—and not quite ready for everyone—it now includes a prompter app of its own.

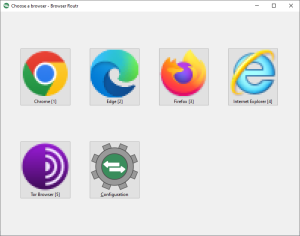
prompter window with large buttons featuring various browser icons

This means Browser Routr can be set as the default browser within Windows or MacOS, so the preferred browser will be opened directly and without having to route through another. It also provides a smoother experience for those who want to be asked their choice of browser for each link they open outside a browser.

Remote Movie Night With Cytube

There are a growing number of ways to enjoy movies with friends without being in the same physical space. One rather technical way is using a special web server called CyTube. It became my choice because it didn’t require everyone have their own subscription to the same streaming service, at least when configured with direct (‘raw’) media links. CyTube also provides a good viewing experience for action movies, has chat rooms, and can serve several movies at once using different ‘channels’. If you’ve got a big family it allows you to have one show for kids and a different, simultaneous show for the adults.

This article is an overview of the technical steps needed to provide less technical friends and family with a simple and inexpensive experience. And with a separate video call it can be similar to having people over for a movie.

What You’ll Need To Host

  • Broadband Internet — usually about 2-5M upload per remote household, if you’re serving media from your network
  • Linux or Mac computer to run CyTube
  • Movie — on disc or on a supported media service
  • Time and patience to work through the technical details

NOTE: Take care downloading software from untrusted sources as they may include unwanted or malicious software. Also, most movies have limits on how many people you can show it to at a time. So if you’re planning a virtual viewing with more than a couple families or friends check that it’s within the limit, or try a co-watching app/extension that supports an official streaming service.

1. Preparing The Movie

If you’re all just going to use one of CyTube’s supported media services you can skip this part.

Beginning with a DVD or BluRay disc you can ‘rip’ the movie into your computer with a program like MakeMKV or HandBrake. For the best experience you may also need to convert it into a format suitable for streaming like H264 within an MP4 file. VideoLAN can help with that, even if their docs are a bit dated.

2. Installing CyTube

CyTube needs a Linux or Mac computer to act as the server which serves up its website interface. So if you’ve already got a home server like a Raspberry Pi or old laptop then follow these instructions to install it. If you don’t then you could try using Windows Subsystem for Linux on your normal desktop or laptop computer.

3. Serving On The Internet

Once you can load CyTube from a browser on your local network you’ll need a way to share it over the Internet with your friends. Typically this is done by forwarding CyTube’s port from your router’s Wide Area Network connection (a.k.a. WAN or Internet connection) to the serving computer. It’s also possible—and usually a bit easier—to put the computer on the DMZ, often a gaming option for home routers. Then look up your Internet address with a service like WhatsMyIP.org and try your IP with the CyTube port on another network like your phone browser with the Wifi turned off. The URL to try will need to start with “http://” and should look something like “http://999.999.999.999:8080/”. If visiting that address loads your CyTube site then you can move on.

To make things even easier you can optionally use a dynamic name service, if you don’t already have one, to serve from a named site like “the-smiths.hopto.org”.

4. Serving Media

This can be skipped if you’re going with a streaming service, otherwise you need to get the ripped movie itself on the Internet too. A file sharing service may work, though popular ones may detect copyrighted media, preventing more than one or two users accessing it. Or in the worst case banning your account for violating terms of service.

If you managed to install CyTube then consider serving the media yourself with a web server like Nginx. Though this does also require configuring a secure (“HTTPS”) connection. And while that can be done for free with Let’s Encrypt it does require that you have a named website, even if it’s from a dynamic service like No-IP.

5. Running The Show

At any point after CyTube is installed and running the site can be setup by logging in as your administrative user, creating the channel, and adding the URL of a media file or streaming video (like “https://my-place.example.com:8443/big-buck-bunney.mp4”). Once everything else is set then share the address of your CyTube install with friends and family.

Notes

  • Chrome browser may require clicking a play icon to load direct/raw video URLs
  • Connect the viewing computer to a TV for a larger display
  • If watching with a separate video call then ask viewers to use headphones, mute when not talking, or keep the movie volume low enough to prevent echo
  • Pausing doesn’t seem to work with direct/raw files or YouTube, try removing the media from the queue and refreshing browsers
  • Viewers joining later may momentarily see the beginning of the movie before it jumps to the stream’s position
Easier Laravel DB Migrations With Zero Downtime

When Laravel is paired with a Mysql DB it can be increasingly difficult to make changes as the installation grows in popularity. While Mysql is getting better with its Online DDL there are still some limitations. And even with the latest online tools Laravel’s built-in migration scripts won’t consistently use them without specialized code. To make minimal-downtime changes easier I’ve helped create an adapter for Percona’s Online-Schema Change (PTOSC) and Mysql’s Online DDL called laravel-online-migrator (LOM).

Consider a Laravel DB migration adding a column: Schema::table( 'my_table', function (Blueprint $table) { $table->string('color', 64) ->nullable(); } ); To use PTOSC the queries have to be manually written as shell commands: pt-online-schema-change \ D=homestead,t=my_table,h=localhost \ --user=homestead --password=secret \ --alter "ADD color VARCHAR(64)" \ --execute Then it must be wrapped in a PHP function like exec, or run outside the normal Artisan migrate workflow. When done outside migrate a row must be inserted into the “migrations” table for each migration, unless Laravel’s built-in migrations will never be run.

Now with laravel-online-migrator the migration script can remain unchanged. When migrate is run the script is automatically changed from this PHP code$table->string('color', 64) ->nullable(); to this command pt-online-schema-change \ D=homestead,t=my_table,h=localhost \ --user=homestead --password=secret \ --alter "ADD color VARCHAR(64)" \ --execute and the command is run.

Before executing migrations the generated commands can also be reviewed for correctness with --pretend like this php artisan migrate --pretend Pretending can be helpful when one is unsure what the adapter will do. When using PTOSC that output can also be copied and pasted into a shell with the --execute flag replaced with --dry-run. Dry runs will confirm with PTOSC whether or not the command is ready before the original table is modified.

LOM tries to be flexible: not changing queries unnecessarily and supporting common ‘raw’ queries as well. So dropping a table won’t go through PTOSC, or if migrations rely on hand-written SQL then they should work without human intervention. For example a raw query like \DB::statement("ALTER TABLE my_table CHANGE fruit fruit ENUM('apple', 'orange')"); will be translated to a PTOSC command, while \DB::statement( "DROP TABLE my_table CASCADE" ); will remain unchanged.

Fine-grained control of which online tool–if any–is used can be found within the configuration file config/online-migrator.php, environment variables like ONLINE_MIGRATOR, and traits on the migration scripts themselves. For more see the documentation on usage. Also of note, the output of “php artisan migrate” will be more verbose in order to aid resolving problems with migration runs.

UPDATE 2019-02-05: Forgot to mention the convenience option doctrine-enum-mapping was included to make changing tables with DB enumerations easier. By setting its value to ‘string’ migrations can use Eloquent code to change enum-equipped tables, though yet not for changing the enum columns themselves.

If this has been helpful please consider commenting here or opening an issue or pull request on the project’s Github.

NOTE: All opinions and thoughts expressed here are my own and do not reflect those of my employer.

How To Export Contacts From OwnCloud Database

For those who need or prefer directly dumping all their contacts from an OwnCloud database, below are commands to do it from a PostgreSQL installation.

Remember to put your OwnCloud user-name in place of the “…” in the query.

psql owncloud --tuples-only --no-align -c \
"SELECT encode(carddata, 'escape') FROM oc_cards WHERE addressbookid = (SELECT id FROM oc_addressbooks WHERE principaluri = 'principals/users/...')" \
> oc_cards.vcf

If you happen to have accented, or other non-ASCII, characters then you may need to convert from octal (“\nnn”) to UTF before trying to import elsewhere.

“User-Agent” Headers Holding Back The Web

Every time you visit a website the name and version of your browser is sent to the service. In fact with every requested image, video, and style sheet the same data is sent again and again. This not only wastes bandwidth, it also subtly encourages web makers to rely upon it as a shortcut to make services work consistently across platforms. Later browsers then include more tokens in their “User-Agent” header to maintain compatibility with these fragile services. Over time the header becomes larger and the web more brittle. For example, Internet Explorer 11 identifies itself as “Mozilla/5.0 (Windows NT 10.0; WOW64; Trident/7.0; rv:11.0) like Gecko”. Can you tell which part communicates that it is Microsoft’s Internet Explorer?

Of course it’s impractical for every web site/service to test every possible combination of browsers and platforms. So those of us developing sites and services only test the most popular browsers at the moment. Over time this leads to a web which caters to a mix of the most popular browser of the past and present, depending upon the time any given service was last made. As more and more devices leverage HTTP for the Internet-of-things this problem may grow more complex. Web standards and feature detection can help.

With well defined standards and run-time detection of features it’s possible to avoid the trap of ‘sniffing’ the browser from it’s UA headers. And while cutting edge features and services may benefit in the short-term from taking the shortcut of browser detection, they can also leverage vendor-specific prefixes of features in flux. Once standardized the prefixes can be replaced with official and non-prefixed names.

My experience detecting significantly different platforms such as mobile or internet-of-things (IOT) devices do still have some valid uses for the UA header. But ultimately they may be better served by a new, simpler header or more platform-independent designs. Until then Mozilla’s recommendations are a reasonable place to start.

In recent years even the once-dominant Microsoft notes the weaknesses and problems with UA headers. Sadly, my experiments sending an empty or minimal UA header have found too many sites broken to recommend the approach to non-technical users.

How about you? What do you think of UA headers?

VirtuaWin Vs. Windows 10 Virtual Desktops

VirtuaWin‘s virtual desktops has long provided the ability to expand your Windows work-space without adding extra physical screens. Now that Windows 10 includes its own virtual desktop/work-space feature I’ve found it both an improvement and a small step backwards. After a few months with both let’s break down how they compare.

Here is a table documenting my findings as of January 2016. (Since Windows 10 and VirtuaWin may evolve in the future I’ll try to keep this up-to-date.)

behavior or capability VirtuaWin Win. 10 Desktops
Boss key to hide other screens Yes No
Compatibility issues with some Intel drivers Yes No
Customize number of screens Yes (up to 20) Yes (100+)
Customize shortcuts Yes No*
Jump-to-screen shortcuts Yes No
Show a window on all screens Yes No
Switching from windows with admin. privileges Yes Requires extra key press
Switching from certain** modal windows No Yes
Vertically aligned screens Yes No
Windows with admin. privileges appear on all screens (bug?) Yes No
Wrap around when switching from first/last screen Yes No
*It’s possible to make alternative shortcuts for Windows 10 desktops using 3rd-party tools like AutoHotKey.
**My LockyWindow product has used a modal window when unlocking to prevent manipulating the underlying KeePass window. VirtuaWin’s switching feature is disrupted by such windows.

While VirtuaWin is more feature packed I personally don’t miss most of the capabilities absent in Windows 10’s desktops. Those most lacking were the jump-to shortcuts and the option to wrap around from the first/last screen. Still, the ability to switch away while administrative windows have focus is much appreciated. Window management in Windows 10 Desktops also feels more user friendly than VirtuaWin’s tray pop-out.

How about you? Do you use virtual desktops? If so which solution works best for you?

VeraCrypt Is Too Slow And Complex

Now that more Truecrypt weaknesses have been revealed the open-source solution taking its place appears to be VeraCrypt. Yet its extra-secure encryption of the system partition adds so many rounds booting is slowed and the extra PIM concept mandates an extra step to every startup. This situation makes it even less suited to non-technical users than TrueCrypt before it.

Steve Gibson may be ready to recommend VeraCrypt, but I don’t think it’s ready for the masses; up to version 1.15 anyway. After clocking my boot time with system encryption it took an extra 85 seconds. Talking non-technical friends and family through even basic use of TrueCrypt volumes was challenging enough. VeraCrypt’s additional Personal Iteration Multiplier certainly adds more security. Still, the extra step and forgettable-yet-necessary element is only making it less novice friendly.

Another long term problem is VeraCrypt’s lack of Secure Boot support. This prevents booting with whole-disk encryption on machines locked down within UEFI’s boot-loader signing. Hopefully VeraCryp support will be done before Secure Boot becomes widespread.

Now having tried the built-in encryption features of Windows, OS X, and Ubuntu Linux the VeraCrypt software does still offer a nice cross-platform solution. The VeraCrypt UI is also easier than Linux, though it has a way to go before being as easy as Windows and OS X. With a little UX love and simpler defaults VeraCrypt has the potential to offer a compelling alternative for regular folks.

Secure KeePass’s Window With LockyWindow

Having used KeePass for years I’ve longed for a way to secure the window while still auto-typing with shortcuts or integration plug-ins. So recently I made LockyWindow as a paid plug-in for the professional edition (v2) of KeePass password safe.

Unlocking the window can be done with the master password or a customizable quick-unlock PIN. The locking period can be customized to fit your preference. One can also lock or unlock using the shortcut or menu item.

You can find out more on the product page at PaulRRogers.com/lockywindow.