Where Are Davinci Resolve 17+ Project Files?

TLDR: If you’re on Windows, probably here:
C:\ProgramData\Blackmagic Design\DaVinci Resolve\Support\Resolve Disk Database\Resolve Projects\Users\guest\Projects.

Please note that your system drive may not be ‘C’, and the user may instead be ‘admin’, presumably if running Resolve as an administrative Windows user.

Now, if you’re hoping to get back an old copy since closing auto-saved unwanted changes then you may be out of luck. Unless that drive has file versioning turned on, or you had already enabled Davinci “Project backups” from “Preferences” -> “User” -> “Project Save and Load”, or you had exported the project earlier.

Still, with this knowledge you can prevent data loss in the future by enabling Davinci “Project backups”, enabling file versioning of your drive in the OS, and/or moving the containing folder to a cloud-synced-folder-with-versions like DropBox; then sym-link the moved folder back to the original location.

Another fun fact, the .db files found therein are SQLite databases, which allows you to peek inside with a variety of different tools.

Browser Routr, Now With Prompter

Ever wish you could more easily dedicate a web browser to only certain sites and still work from your primary browser the rest of the time? I certainly have, yet all the tools I had found for doing so required either manual copy-pasting once inside the browser of choice, or right-clicking to bring up a prompter app. Browser Routr was made to allow automatically routing navigation within a browser to another, based on the website.

For example, one can click a link to Google Sheets from Firefox and have it open in Chrome without any more clicks or keyboard shortcuts. And while Browser Routr is still in beta—and not quite ready for everyone—it now includes a prompter app of its own.

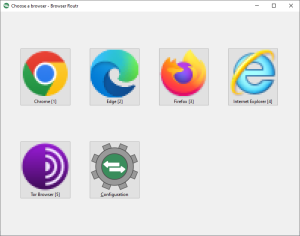
prompter window with large buttons featuring various browser icons

This means Browser Routr can be set as the default browser within Windows or MacOS, so the preferred browser will be opened directly and without having to route through another. It also provides a smoother experience for those who want to be asked their choice of browser for each link they open outside a browser.

Pandemic-From-Home Is Not Your Typical WFH

Having spent a few years in the various home and office circumstances I think it’s important those in management understand that this pandemic remote-work is different from the normal work-from-home experience.

Since 2004 I’ve worked a few years in each of the common arrangements: open offices, cubicle farms, a private office, a 50-50 home and office split, 100% work from home, and now pandemic from home. Some teams were a hybrid mix of WFH and office workers while others were fully in office or fully remote. Now the advantages of in person work are so often retold that I’ll focus here on non-pandemic remote work (i.e. WFH) and its distant cousin, pandemic-from-home (PFH).

PFH’s disadvantages are legion: socializing requires some unpredictable combination of distancing, masks, warm weather, hospital-grade ventilation, alternative childcare, and intentional screen time paired with quality Internet service. Given how much work had already migrated from physical tasks to the screens it’s understandable why those most gregarious among us suffer.

Altogether these PFH limitations also interfere with the non-work activities needed to fulfill our mental, physical, and emotional needs. Of those challenges, WFH only shares the need to be intentional about communication and to maintain a solid network connection.

PFH’s few benefits are only a modest silver lining:

  • broader acceptance of WFH, albeit tainted by PFH
  • increased demand and wages for tech workers outside tech hubs
  • more tools for remote work

Whether living through a pandemic or not, WFH retains its strengths:

  • broader talent pools
  • more personalized environments for employees
  • less pressure to choose between proximity to family and work
  • less/no time lost commuting
  • lower/eliminated real estate costs

What do you think? If you have any thoughts or PFH or WFH experiences to share then please comment.

Prep Your Computer For Screen Sharing

It can be intimidating and a little risky to share your screen with a wide audience. Whether for a work demonstration or some streaming fun there is some basic hygiene which can help avoid disclosing personal info or even what apps you rely on.

Here are some ideas to keep your computer ready for screen share at any moment.

Auto-hide Task/menu Bars And Docks

Screens are getting wider and sometimes even a little shorter than in years past; so consider automatically hiding or moving widgets such as the taskbar or dock, menu-bar (most common on Mac), or sidebar. This leaves more room for what you’re trying to show and more space to work. You can usually push the pointer to the edge or press a key to get them when necessary.

  • Windows 10:
    right-click the taskbar
    -> “Taskbar settings”
    -> “Automatically hide the taskbar in desktop mode”
  • MacOS:
    “System Preferences”
    -> “Dock & Menu Bar”
    -> “Automatically hide and show the Dock”,
    “Automatically hide and show the menu bar”

Solid Color Background

Unless you really need or want to share your background then consider keeping it a solid color. Black might even help save bandwidth or battery life depending on what you’re sharing or the kind of display. There’s also no risk of NSFW photos appearing from within your albums.

  • Windows 10:
    right-click the desktop
    -> “Personalize”
    -> “Background”
    -> click drop down
    -> “Solid Color”
  • MacOS:
    “System Preferences”
    -> “Desktop & Screen Saver”
    -> “Apple”
    ->”Colors”

Practice Using Do-not-disturb

Windows 10 has “Focus Assist” and MacOS calls it “Do Not Disturb”, though whatever the name, practice turning on and off these features. They can help avoid revealing private messages or reminders during a screen share or stream. You may even be able to automatically enable them or set them to turn off after a set period of time.

  • Windows 10:
    right-click the speech bubble in taskbar
    -> “Focus assist”
    -> “Priority only” or “Alarms only”
  • MacOS:
    click sliders icon in menu bar
    -> “Do Not Disturb”

Separate, Smaller Monitor

Sharing or streaming from a separate screen allows you to manage other tasks or private data without sharing everything. This is especially useful for presenters or recorders who may also be taking notes, checking things off, or handling private questions while sharing. In my experience using a smaller screen helps since some viewers may have small screens which make it harder to read scaled down text from a larger, shared view.

If you must work from one screen consider exploring virtual ‘cameras’ or virtual screens which can take a slice of your larger/wider monitor, without sharing it all. Sometimes an entire virtual machine, or VM, can help since its window can be shared and its settings configured for sharing differently from your host computer.

Specialized Profile

Consider a special share/streaming user account on your computer which only includes the apps, contacts, and files you know are safe to share or stream. This can help if special screen resolutions or settings are needed yet different than your usual working profile.

Spare Headset And Mic Check

Headsets work best since they reduce the need for your computer to cancel any noise or echo from other folks talking along with you. Consider also keeping an extra headset within reach in case of technical difficulties, such as battery exhaustion or software glitches. And do a microphone check periodically to ensure you can be heard without problems.

Special Treatment For Chrome Makes Everyone Else Second Class Web-citizens

As a web developer I get it, testing against a bunch of different browsers is more work. Hard to justify the effort when there is this great, cutting edge browser pumping out features. One already used by a near super majority in the most lucrative markets. Even many of its most popular competitors are using it as a foundation for compatibility. And marketing too may see value in targeting Google’s Chrome browser.

Yet the reality is that unnecessarily straying from web standards, neglecting testing against other browsers, or delivering different experiences by browser ultimately pushes alternative users further and further away. This tyranny of the majority and exploiting “valuable signals” adds more roadblocks in front of those who are—or try to be—different.

As a user of an alternative browser myself it’s tiring getting opaque error messages, blank pages, or broken forms when all I want to do is some light reading and occasionally submit something. Switching to the dominant / ordained browser often reveals an easier flow, extra options, or an otherwise problem-free experience. But I don’t want to go back to a browser mono-culture.

One of the original aspirations in the web’s early days was that it enabled connecting people who were different or marginalized. A place where one could interact without being instantly judged by superficial qualities, a place outside the sameness bubble. Even if it’s just a small choice like using and supporting a different browser, let’s strive to fulfill that vision of diversity and inclusion.

Modern Game Controllers Have Too Few Buttons

Whether PC, Playstation, Switch, or Xbox the game controllers entering 2021 have settled on about 16 buttons as the norm, yet I think it’s too few in light of the complexity in modern games. Take for example Doom Eternal, the sequel to the re-reimagined Doom from 1993. The series return to fast movement now includes controls for melee combat, platform jumping, dashing, weapon mods, and equipment. For ardent fans of gaming this variety is welcome even if requires more mental overhead and dexterity. Personally though I’d rather trade the gimmicky touch inputs and multi-use buttons for more single purpose, physical buttons.

On PC players can customize their controls and draw on a full keyboard or mice with configurable buttons. Console and other gamepad-only players are stuck with a button limit from the PS1 era, dating back to 1997. Even the very experimental Nintendo hasn’t added any more physical inputs to their controllers in these past 23 years. The closest mainstream option is Microsoft’s Elite Wireless Controller which offers four more buttons, albeit with spotty game support and a hefty price tag.

My fear is that as games continue to add interesting capabilities that the same buttons will gain more and more modes until it’s as Byzantine as Apple iPhone’s home button. Weapon/equipment wheels are one symptom that this is already happening. And their impact on fast action games is so disruptive that some titles pause or slow game time to accommodate their awkwardness.

Join Multiple Zoom Meetings For Free

Paid Zoom plans officially support joining multiple meetings at once, yet this is also possible on a free account if you don’t mind some of the quirks.

One meeting can use the desktop app—or a browser—but the others must all join from within a web browser. Using a browser can actually be a challenge as the native app tries to automatically launch whenever meeting links are loaded. So you may want to use a browser extension like this one, or maintain a separate browser or profile which doesn’t auto-open meeting links in the desktop app. In the latter case the process will also include clicking the big, blue “Launch Meeting” button then waiting for the smaller “Join from your browser” link to appear.

With everything connected managing the audio can be a chore since they’ll play simultaneously and your mic will pick up the others’ audio too. Muting yourself and using a headset are a must. It may also help to assign the other meeting’s audio to a separate speaker, such as those connected to another laptop/screen where the other meeting is on display.

For even more control over the volume of the meetings there is BackgroundMusic for Mac and Windows’ own Volume Mixer which can set different levels for the native app and your browser(s). Putting each meeting in a different browser is an option if you don’t use the desktop app at all or want to connect to more than two meetings at once.

Why No Wing Commander Or Privateer Remasters?

Some large game franchises are remastering or rebooting games less than 20 years old, many of which have already aged quite well. So why can’t we get some older ‘classics’ like early Wing Commanders (1990, 1991) or Privateer (1993) at least an HD upgrade? Several spiritual successors have been attempted and there are no fewer than three different fan-made attempts.

As great as the originals were back in the day their actual gameplay is now hopelessly dated. And I say that as someone who enjoyed them as a youngster in the 90s. That said, the stories and characters retain much of their charm, despite some stereotypes and tropes. Props to those making patches and fan remakes to breath some new life into these vintage franchises. Sadly their efforts still have too much jank for my taste.

If only there were some modest quality-of-life and graphical upscaling these old experiences could be restored for a new generation. Ideally some mod support would be included so the community can carry the torch once the rights holders lose interest.

Running Laravel’s Own Tests

After some exploring here are the steps to get Laravel Framework‘s own tests passing on Ubuntu Linux, or Window’s WSL2, with PHP 7.4:

# For older releases without PHP 7.4
sudo add-apt-repository ppa:ondrej/php
sudo apt-get update

# Install library and server dependencies
sudo apt-get install \
  memcached \
  php7.4 \
  php7.4-dev \
  php7.4-dom \
  php7.4-mbstring \
  php7.4-memcached \
  php7.4-mysql \
  php7.4-odbc \
  php7.4-pdo \
  php7.4-sqlite \
  redis-server

# Start local servers that tests rely on
sudo /etc/init.d/redis-server start
sudo /etc/init.d/memcached start

# Change directory to the framework or fork folder
cd framework

# Copy the test configuration
cp phpunit.xml.dist phpunit.xml
# Remove comments around Redis settings
sed --in-place --regexp-extended \
  --expression='s/(<!--|-->)//g' phpunit.xml

# Install PHP dependencies
composer update --prefer-lowest \
  --prefer-dist \
  --prefer-stable \
  --no-interaction

After all that it should be possible to run the tests with ./vendor/bin/phpunit. Then the usual flags can help to run ones own tests like --filter testMyNewFeature.

Remote Movie Night With Cytube

There are a growing number of ways to enjoy movies with friends without being in the same physical space. One rather technical way is using a special web server called CyTube. It became my choice because it didn’t require everyone have their own subscription to the same streaming service, at least when configured with direct (‘raw’) media links. CyTube also provides a good viewing experience for action movies, has chat rooms, and can serve several movies at once using different ‘channels’. If you’ve got a big family it allows you to have one show for kids and a different, simultaneous show for the adults.

This article is an overview of the technical steps needed to provide less technical friends and family with a simple and inexpensive experience. And with a separate video call it can be similar to having people over for a movie.

What You’ll Need To Host

  • Broadband Internet — usually about 2-5M upload per remote household, if you’re serving media from your network
  • Linux or Mac computer to run CyTube
  • Movie — on disc or on a supported media service
  • Time and patience to work through the technical details

NOTE: Take care downloading software from untrusted sources as they may include unwanted or malicious software. Also, most movies have limits on how many people you can show it to at a time. So if you’re planning a virtual viewing with more than a couple families or friends check that it’s within the limit, or try a co-watching app/extension that supports an official streaming service.

1. Preparing The Movie

If you’re all just going to use one of CyTube’s supported media services you can skip this part.

Beginning with a DVD or BluRay disc you can ‘rip’ the movie into your computer with a program like MakeMKV or HandBrake. For the best experience you may also need to convert it into a format suitable for streaming like H264 within an MP4 file. VideoLAN can help with that, even if their docs are a bit dated.

2. Installing CyTube

CyTube needs a Linux or Mac computer to act as the server which serves up its website interface. So if you’ve already got a home server like a Raspberry Pi or old laptop then follow these instructions to install it. If you don’t then you could try using Windows Subsystem for Linux on your normal desktop or laptop computer.

3. Serving On The Internet

Once you can load CyTube from a browser on your local network you’ll need a way to share it over the Internet with your friends. Typically this is done by forwarding CyTube’s port from your router’s Wide Area Network connection (a.k.a. WAN or Internet connection) to the serving computer. It’s also possible—and usually a bit easier—to put the computer on the DMZ, often a gaming option for home routers. Then look up your Internet address with a service like WhatsMyIP.org and try your IP with the CyTube port on another network like your phone browser with the Wifi turned off. The URL to try will need to start with “http://” and should look something like “http://999.999.999.999:8080/”. If visiting that address loads your CyTube site then you can move on.

To make things even easier you can optionally use a dynamic name service, if you don’t already have one, to serve from a named site like “the-smiths.hopto.org”.

4. Serving Media

This can be skipped if you’re going with a streaming service, otherwise you need to get the ripped movie itself on the Internet too. A file sharing service may work, though popular ones may detect copyrighted media, preventing more than one or two users accessing it. Or in the worst case banning your account for violating terms of service.

If you managed to install CyTube then consider serving the media yourself with a web server like Nginx. Though this does also require configuring a secure (“HTTPS”) connection. And while that can be done for free with Let’s Encrypt it does require that you have a named website, even if it’s from a dynamic service like No-IP.

5. Running The Show

At any point after CyTube is installed and running the site can be setup by logging in as your administrative user, creating the channel, and adding the URL of a media file or streaming video (like “https://my-place.example.com:8443/big-buck-bunney.mp4”). Once everything else is set then share the address of your CyTube install with friends and family.

Notes

  • Chrome browser may require clicking a play icon to load direct/raw video URLs
  • Connect the viewing computer to a TV for a larger display
  • If watching with a separate video call then ask viewers to use headphones, mute when not talking, or keep the movie volume low enough to prevent echo
  • Pausing doesn’t seem to work with direct/raw files or YouTube, try removing the media from the queue and refreshing browsers
  • Viewers joining later may momentarily see the beginning of the movie before it jumps to the stream’s position